Tuesday, July 28, 2009

The Tomatillo - This Year's Great Love


We rarely plant the same tomatoes every year. Despite our promises to ourselves at the end of summer that we will seek out the variety we relished from that year's harvest, by the following Spring we can barely remember our names let alone the tomato we so treasured months before. Every Spring there is an event here in Los Angeles called "Tomato Mania" - it is the Disneyland of tomatoes! There are over 200 varieties! The spectacle of it placates the amnesia and, giddy with the thought of the summer harvest, we end up choosing 7 or 8 random varieties of tomato seedlings.

We love our tomatoes. We relish our tomatoes. But our approach to growing them is a little more scattershot than most. A little more punk rock, if you will. We put them in our organically composted ground. We give them a proper support system. Too much water. And then watch them mature with the same eagerness and enthusiasm as our 6 year old daughters.

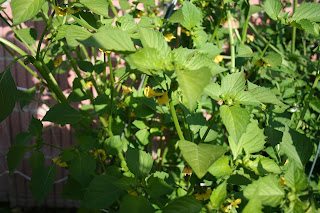
On this year's tomato adventure we discovered the Tomatillo. It is a gorgeous plant. It produces hundreds of beautiful green fruit wrapped in delicate husks. You know they are ripe when the husks begin to brown and peel away. The fruit is sweet and delicate and delicious sliced on its own.

But they are commonly and, I would argue, best used to make salsa verde. Here is a very simple recipe that is guaranteed to make you drool and impress your friends:

  • Gather all the tomatillos you can and roast them in the broiler for about 5 minutes (until soft). They should be browned but not burnt. Cut large ones in half and place cut side down.
  • You can also roast (2) jalepenos along with the tomatillos. Make sure they are stemmed and seeded. If you like it hot, leave in the seeds.
  • 1/2 cup of chopped white onion
  • Cilantro (maybe 1/2 cup, but you can add more or less)
  • Salt to taste
  • The juice from (1) small lime

Take all of the ingredients, while they are still hot, and put them in a blender . Pulse until pureed. Salt to taste. Cool in fridge (although I eat it warm out of the blender). After a day, this thickens up quite a bit. The salsa will keep for a week in the fridge, well covered.

Wednesday, June 10, 2009

How To Get Rid Of Pill Bugs - The Research


Our beautiful raised bed garden has turned into a sea of potato bugs / pill bugs / charlie bugs / rollly-pollies / sow bugs. See that beautiful photo of my beans? They ate that entire row of young bean plants in a night and then started on an Early Prolific Squash. I have never seen these docile cute little bugs swarm before. They are voracious.

Where did they come from? While we certainly have our share of all sorts of bugs we've never had this many sow bugs. As I did my internet research on how to be rid of them I learned they like to feast on decaying matter and young seedlings. I'm guessing they had a very cozy life inside the organic compost I used to start my garden. I don't mind sharing some of our garden with nature but this is nuts!

So, how to be rid of them? Since our goal is to raise vegetables and fruits without chemicals we are looking for a natural, "Little House on the Prairie" solution to this problem. Here's a variety of solutions we've learned thanks to a handy google search.

What you need to know about these fellers is they work at night. During the heat of the day they go dormant. They lounge in the shade of plant leaves, crowded together, hording moisture. At night, when the humidity rises, they go to work.
  • Remove them by hand. Pick em up. Smoosh em. Or relocate them. This didn't work for us as there were just too many. At the height of it I could pick up trowels full of them.
  • Reduce the moisture in the garden by watering in the mornings. These little buggers thrive on moisture. If you water in the mornings the moisture will soak in throughout the day and the top layer of soil will be dry by evening. In theory, without moisture the pill bugs will go elsewhere. This helped but would not have sufficed on its own.
  • Once your plant is mature, try to raise the vegetation off the ground as they will eat a whole squash!
  • Use Sluggo Pellets, which supposedly dissolve and add iron to your soil. I didn't try these as I didn't feel 100% sure about the "naturalness" of this product.
  • Set a trap using over-ripe fruit. Place fruit in various spots of the garden. The sow bugs will make a meal of the fruit throughout the night. In the morning, pick up the fruit loaded with pill bugs. Toss it. This TOTALLY WORKS!!
  • Set a trap using newspaper. Take tightly rolled newspaper and soak it with water. Put it in the garden at the end of the day. The rollie-pollies will feast on it all night. In the morning, you should find a paper loaded with pill bugs. Toss it. This TOTALLY WORKS!!
  • A blogger from Australia says he uses cayenne pepper and/or curry powder as a deterent. He puts a mixture of cayenne pepper and curry powder in the soil around his tomato and potato plants and has found that to be an effective deterrent. I haven't tried this one yet but I have found that cinamon is an effective deterrent for ants...that'll be a whole other post.
  • Use Diatomaceous Earth. Diatomaceous Earth eliminates the pill bugs by dryingthem out and can be harmful to worms. I love my garden worms so I haven't tried this solution.

Monday, June 8, 2009

Using Gray Water

California is in the midst of a horrible drought and so we've begun using the gray water from the girls' bath to water the garden and lawn. So far, it hasn't killed anything (they use small amounts of soap) and it's fun for us. I suspect our neighbors think we have some serious plumbing problems as they watch the four of us hauling buckets of water out the front door and dump them on the lawn.

I heard an interesting story on NPR today about people who are illegally using gray water from their washing machines to water their gardens. I'm going to investigate further but I wonder -- do you have any advice or experience with using gray water?

Monday, May 11, 2009

Community Gardens In Our Front Yard

There's an interesting article in the Los Angeles Times Food section about a budding network of community gardens. This makes us very happy. In our dream of what it means to grow enough organic veggies and fruit to sustain our family, we realize we will likely need to expand our 14 x 7 foot garden and/or establish some sort of trade network with other gardeners. It appears as though Heart Beet Gardening is leading the charge locally by trying to form its own CSA. I've reached out to them about contributing produce but, according to their website, it appears as though a significant financial contribution is required to participate. Good for them that they are able to build a business! I'm interested in something truly community-based, maybe even neighborhood based. Has anyone started their own CSA? Or perhaps a fruit/vegetable harvest exchange? I'd love to hear about your experience.

Oh, we're drawing up plans on what the front garden would look like. We've heard rumors that because of the drought the city of Los Angeles is considering paying homeowners to remove their lawns! Yep, we're investigating that rumor.

Friday, May 8, 2009

Composting: It's a Process

Our composting has begun but, I must say, it's not the magical experience I've been reading about on blogs.

a) it does smell
b) we have LOTS of flies

I am now realizing that all of the blogging about how great composting is...the nature of it all...reminds me of what we read about breast-feeding. "Oh, the intense bond", "it's natural", "it's healthy", "it's so easy"... Breast-feeding was certainly NOT easy. At least, in the beginning. And I guess once we all figured out what we were doing, it became easy..ish... I'm hoping for the same results with composting!

MY PROBLEMS (and possible solutions):


  • a) The Smell. I remembered from what I read, I need a good mix of greens & browns. The pile was mostly appropriate food waste and it just looked like it needed some dry leafy matter. I mixed in some already decomposing leaves, and sort of cut everything up into smaller bits and the smell was gone in a couple of hours.

  • b) The Flies. After I added the brown matter, mixed the pile, I covered it with a kitchen garbage bag. It's a temporary solution but it worked!


  • c) I have no heat from my heap! When I hold my hand close to the pile...nada, nothing, zilch. I believe I need green matter, specifically lawn waste. The coolness of my pile makes complete sense given that I haven't mowed the lawn in three weeks! Oh boy do I have a chore ahead of me tomorrow. I dropped the push mower at the shop to get the blades sharpened so, with any luck, my pile will be nice and hot by Tuesday.


  • d) The refuse from my huge clearing! After reading Margaret Roach's column about how she effectively chopped down her HUGE compost pile of sticks, leaves, and branches I'm going to give that a go this weekend as well. I have the space to build a pile dedicated to the batch of stuff. Might as well see what happens.


  • (NOTE: This photo shows one of the two piles of refuse I'm going to try to compost. There's plenty of aggressive, strong, down-right mean bouganvillea branches in there. I suspect they won't breakdown at all and will thousands of years from now be harvested as weapons of war. )

Friday, May 1, 2009

Well, If Google Does It...


We've had pretty heated debate about the usefulness of Twitter in our house. But I found this little nugget today, under the hot top GOOGLE RENTS GOATS. I mean, if Google does it perhaps we should consider the goat. The Kids are sold on and it would be pretty great to see Monica milk the thing...

Friday, April 24, 2009

The Map of Our Garden


Here's the "plans" for our garden. I'm pretty sure they're indecipherable to anyone but us. What's fantastic about this document (to me, anyway) is how functional it was. We played with a few different shapes for the garden and ultimately settled on this E-shape.

We put the veggie plants where it seemed logical. We did some research in the incredibly helpful book "The Gardener's A-Z Guide to Growing Organic Food". The info is laid out simply and is easy for either quick reference or a deeper read. It says what food are good or bad to grow together.

We have beans and peas along the back wall. In front of the beans, tomatoes (those are the red blobs). Running the length of the garden, in front of the tomatoes will be our watermelon. One section of the "E" is dedicated to squash. The middle section is strawberries, radishes, and carrots. Lastly, peppers and eggplant.
I'm excited to for mid-July when we'll be able to see how our map compares to the real deal!


Compost: The Beginning

THIS AREA WILL SOON BE HOME TO OUR COMPOST PILE!!!


We're joining the movement!

For the last two years, everyone we know has bragged and sometimes griped about their compost. We've watched as friends worked their way through two or three different compost bins, talked about the joys of "tea", and swore up one side and down the other that "compost doesn't smell". (BTW, we still don't believe that).

Lots of internet research, field research amongst our friends, and questions about the smelliness of compost piles and here's what we've decided:

As wanna-be DIY'ers, we're going to go the fencing and chicken wire route! We're drawing up the very simple plans now for a two-compartment compost heap in the the ridiculously overgrown patch of weeds and God-knows-what-else behind the garage that we have to clear out this weekend.

All I can say about the idea of us & composting...this ought to be good! We may have to post videos!

Wednesday, April 22, 2009

Lizard's Claw Fungus!!


The recent heatwave - two days of nearly 100 degrees - gave rise to a weird fungus!!! It sprouted up like a healthy plant. Monica got in there, dug it up and it turns out it's a stinky fungus from New Zealand called Lizard's Claw!! What in the world?!?!

We're guessing it came from the "organic compost" I bought. That does it! Only our own compost from now on! I hope this doesn't infest our whole garden!

Wednesday, April 15, 2009

Our Garden's Design


We created a 14 x 7 foot raised bed garden in a mostly sunny spot at the back of our yard. We created the raised bed out of cinder blocks that we bought at Home Depot. I price shopped and, with lots of encouragement from Monica, even tried to go the free Craig's List route but ultimately spending around $36 at the Home Depot ended up being the easiest and most econmical route. We decided to use cinder blocks instead of wood because we wanted the flexibility to be able to change the shape and, frankly, it was considerably cheaper.

I turned the soil with a big ole pick axe and then filled the bed with three GIANT bags of organic compost from Anawalt ($9.99 per bag). I dig mix the compost into the top soil and now I can see that I need to dump maybe another two bags over the top.

We were going to get some of the free compost from Griffith Park but we did a little digging and discovered that it's not organic. We really want to have an organic garden and so we decided to forgo the free stuff. If you're in Los Angeles and not as particular about this as we are then you should get your compost from Griffith Park! Be sure to bring a container and your own shovel.

We mapped out our garden using just our instincts. Then we consulted this handing organic growing guide and discovered that we actually matched plants well. Little did we know that certain plants don't work well together. We chose our veggies based on our likes and curiosity.

I bought some string bean and sugar snap peas from the Farmer's Market and Monica went nuts at the Fullerton Arboretum Monster Tomato & Pepper Sale and bought pepper plants, squash, eggplant, and some tomato plants. (NOTE: she is still trying to track down the Hungarian Hearts we fell in love with last summer...can anyone help?)

For the heck of it, we planted some red leaf romaine, which seems to be surviving and actually growing! Heck, we may even get a salad out it.

Still to do: gotta get that herb garden going; more strawberries; some carrot seedlings; and cucumbers!